Managing Unwanted Emails in Gmail

May 16, 2014 by Staff Writer
Managing Unwanted Emails in Gmail
We all get unwanted email. Whether it’s a local company advertising its wares, a representative from a timeshare company you mistakenly gave your email address to, or the unwanted electronic missives from an old school buddy you are now trying to avoid, unwanted email can be a bane to anyone wanting a nice clean inbox. Fortunately, for Gmail users, Google has provided a nifty way to manage unwanted mail. Below is a breakdown.

First, go to your inbox. In the top right-hand corner you will see a cog-type symbol which symbolizes 'Settings':


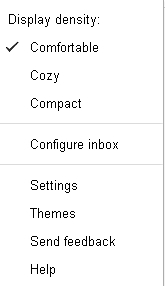
Click on the symbol and a dropdown menu appears:


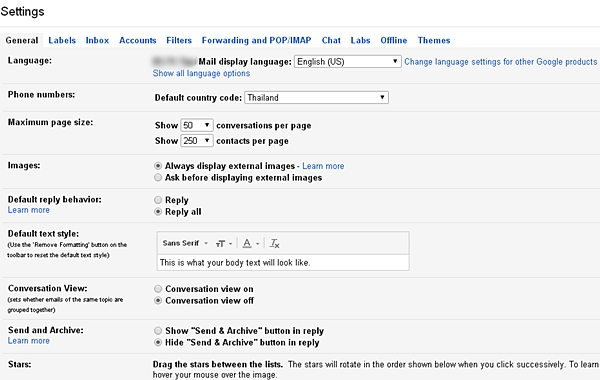
Select the Settings and the backend of the email appears:


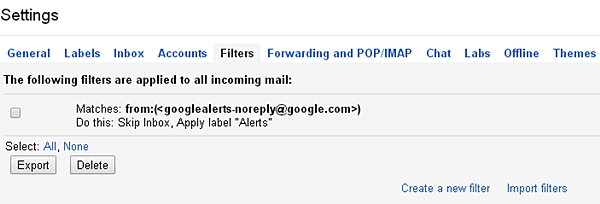
Now, click on 'Filters' and a new interface appears:


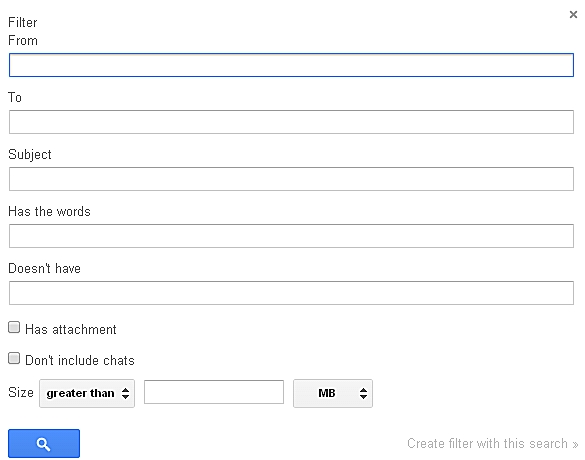
Now, click on "Create a new filter" and an input box appears:


This time you have to be creative. Look at the annoying email that you keep receiving. If it is from a specific person or email address, add that email address into the ‘From’ line.

If it is spam and comes from a range of addresses but always has the same subject line, add the content of that subject line to the ‘Subject’ line. If the email comes from random email addresses, has different subject lines, but the text always contains something consistent (for example, ‘timeshare’), then add that word/those words to the ‘Has the words’ line.

You can even go so far to manipulate emails that do NOT contain certain words (using the ‘Doesn't have’ line), as well as emails that have attachments (click on ‘Has attachment’), or even play around with emails with attachments above a certain size (see ‘Size’ field).

If you get regular unwanted email from ‘annoyingemail@annoyingmail.com’, add that to the ‘From’ line and click ‘Create filter with this search’. Another interface appears:


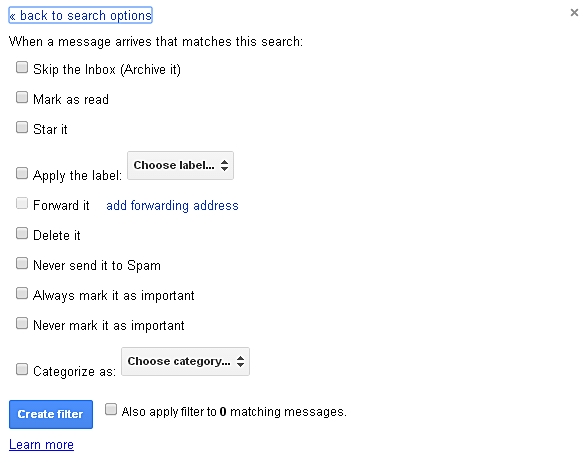
Now you have to get creative again and decide what you want to do with the email. You can ‘Archive it’, which means it is stored in your account but never seen in your inbox, or you can simply ‘Delete it’. Alternatively, you can ‘Forward it’. Unfortunately, you can’t forward it simply to anyone’s account, just to accounts you own – Gmail forces you to verify an email it sends to your account to prove ownership!

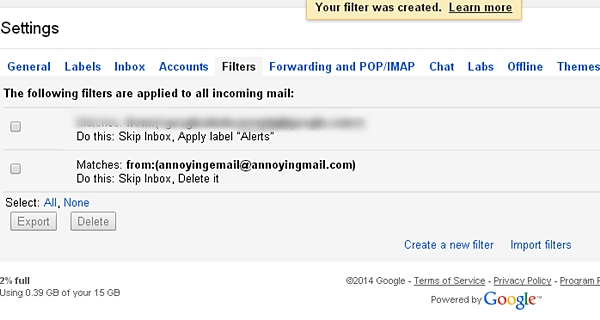
Once you have decided what to do with the email, click on ‘Create filter’ and your filter is put into your filter list:


From now on, every time you receive an email from ‘annoyingemail@annoyingmail.com’, Gmail will manage it based on the criteria you have set. And that means you can manage annoying email in any way you see fit! You need never see an unwanted email again!


Article Rating

Rate this article:

Article Rating

Rate:

  • 1
  • 2
  • 3
  • 4
  • 5

Top 3 Hosts From Our Search

1OVHcloud
2BlueRay Concepts
3YouStable